Thanks! It's cost me just under £40 ($60). This includes everything (printer ink, PDF's, card stock etc) and I have enough card, foam board, ink etc left to make more. Also I'll always have the PDF's.
I am taking a hard look at this series of posts, as I hope to duplicate what you were able to do with this Card Terrain. Any advice you could pass along to me would be greatly appreciated. I would have e-mailed you directly but I don't see your e-mail anywhere so hopefully you will see this.
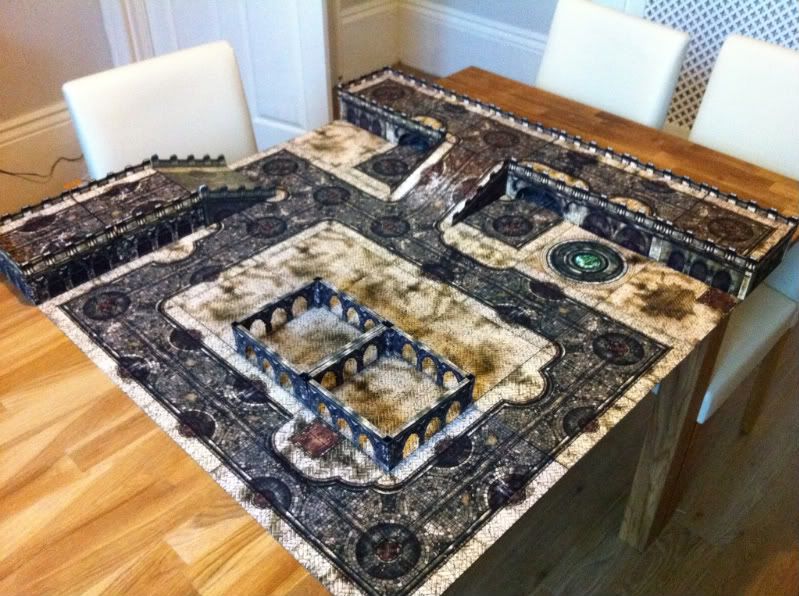
1. Dont underestimate how long it takes to print, cut, glue all of this stuff. It took longer than I thought it would.
2. If your using the suggested method of base tiles treble the amount of time. This is very time consuming. If you dont mind about constantly changing your bases layout go with how I did mine with self adhiesive 12"x12" floor tiles.
3. Use a high or bright white card stock. The images come out WAY better.
4. Go really easy when scoring the folds. A little pressure and you've cut right through. Try scoring with a black biro instead.
5. Plan on paper in advance. This will save you loads in paper and ink.
6. Change your blase regularly. A dull blade makes it hard to cut and tends to veer off and cut what you dont want cut!
Thats all that springs to mind for now. Any specifics just give me a shout here.
I downloaded the Tile Planner and have started messing around with the base layout. I love your idea with the self-adhesive tiles, hopefully I can find them around here, as this seems way easier to do then creating the "blocks" from World Works.
Thanks Again for the assist... and let's see a battle on your creation already !!! :)
I had my first battle on it on Wednesday night. My Showgirls vs McMourning in a 25ss scrap. Most of the minis werent painted so it wasnt much to show but as we're preparing for our first fully painted tournament it's only a matter of time!
Well, it's not the best of photo's, but it provides a little taste of the game. Also shows the scale that the minis look on it. The table if fantastic, and makes the world of difference to play on. Kudos to Andy for getting it made, and making the gaming experience better! :)

Looks good. We have been debating whether or not to purchase any of these pdf's and I think you have inspired us to give them a shot.
ReplyDeleteThanks Magilla. Its definitely worth a go.
ReplyDeleteIf your not too worried about switching around the floor layout then go for how I did mine. Cheaper and much much quicker.
Going to have my first game with it tomorrow so I'll let you know how it goes!
looks awesome,
ReplyDeletehow much did it cost, if you dont mind me asking?
Thanks!
ReplyDeleteIt's cost me just under £40 ($60). This includes everything (printer ink, PDF's, card stock etc) and I have enough card, foam board, ink etc left to make more. Also I'll always have the PDF's.
Andy
I am taking a hard look at this series of posts, as I hope to duplicate what you were able to do with this Card Terrain. Any advice you could pass along to me would be greatly appreciated. I would have e-mailed you directly but I don't see your e-mail anywhere so hopefully you will see this.
ReplyDeleteThanks for the comments Snake-Eyes.
ReplyDeleteAny advice hmmmm......
1. Dont underestimate how long it takes to print, cut, glue all of this stuff. It took longer than I thought it would.
2. If your using the suggested method of base tiles treble the amount of time. This is very time consuming. If you dont mind about constantly changing your bases layout go with how I did mine with self adhiesive 12"x12" floor tiles.
3. Use a high or bright white card stock. The images come out WAY better.
4. Go really easy when scoring the folds. A little pressure and you've cut right through. Try scoring with a black biro instead.
5. Plan on paper in advance. This will save you loads in paper and ink.
6. Change your blase regularly. A dull blade makes it hard to cut and tends to veer off and cut what you dont want cut!
Thats all that springs to mind for now. Any specifics just give me a shout here.
Andy.
+++ Advice Received Kind Sir +++
ReplyDeleteI downloaded the Tile Planner and have started messing around with the base layout. I love your idea with the self-adhesive tiles, hopefully I can find them around here, as this seems way easier to do then creating the "blocks" from World Works.
Thanks Again for the assist... and let's see a battle on your creation already !!! :)
+++Your Welcome!+++
ReplyDeleteI had my first battle on it on Wednesday night. My Showgirls vs McMourning in a 25ss scrap. Most of the minis werent painted so it wasnt much to show but as we're preparing for our first fully painted tournament it's only a matter of time!
Well, it's not the best of photo's, but it provides a little taste of the game. Also shows the scale that the minis look on it. The table if fantastic, and makes the world of difference to play on. Kudos to Andy for getting it made, and making the gaming experience better! :)
ReplyDeletehttp://i531.photobucket.com/albums/dd354/Jamesthegreatest/table-1.jpg
James.